Holiday Looks # 1 ~ Gold & Glamourous....
It's hard to believe that December is already here! This year has just flown by...but I am really excited to kick off the month with a new Makeup series. I will be doing 3 Holiday looks. Everything from simple to dramatic!
The first look is all about shimmery gold eyes and sexy red lips!
As always start with a well hydrated face. I usually put my moisturizer on about 10 minutes before applying my makeup. If you have applied your moisturizer and it's been more than 30 minutes apply another light layer. This will help your makeup go on easier and help it to look better.
I started with the eyes today...first I used a soft gold cream base all over the lid. I softly blended that with my finger up into the crease. Using a fluffy blending brush I took a matte taupe shade and blended that through my crease using windshield washer motions.
Then I took a matte white & matte cream mixed together and applied that to my brown bone for my highlight. Next I used the same brush I used for the taupe and blended that all together. Next I patted a gold shadow all over the lid with a flat dense brush and lightly blended that into the taupe....
Using my fluffy blending brush I applied a matte deep brown and placed the brush in the outer corner and did very small circles and slowly started blending that into the outer crease. Use the very tip of your fluffy blending brush for this step, don't swirl the brush in the shadow just dab it. You won't end up with too much product on the brush and it will do the hard part of blending for you. Then take a flat eyeliner brush and pat into a matte black and then use stamping motions into your upper lash line. I wanted the eyes to be defined but I didn't want a strong black liner since the lips are so bold.
Next apply your favorite mascara and if you choose false lashes...

Don't forget to your lower lash line. I applied the shadow the same way I applied on my lid: first the gold in the center of the lower lash line, then a little of the taupe, then in the outer corner the deep matte brown. And of course blended all three together!
Finally you can start working on the rest of your face. Be sure to fill in your brows, as this is a bold look you want to keep the face balanced. If you need help with how to fill in your brows click here.
I then dotted my foundation all over my face and used my damp beauty blender to blend it all in. I applied my concealer in an upside down triangle under my eyes and use the mini beauty blender to blend all that in. Lastly I used a translucent powder to set it all. Always remember when setting your concealer to pat on the powder as opposed to wiping...if you use wiping motions you will disturb the makeup you just applied.

Next I applied a matte bronzer to the outer perimeter of my face - I wanted more of a soft contour as opposed to a heavily chiseled look. I applied a blush that was a combination of a peach, pink and a purple. Lastly I applied a golden highlighter to the highest point of my cheekbones, a touch on the bridge of my nose and just a tiny bit on my cupids bow. To get a really soft glow use bouncing motions when applying your blush & highlighter.
First apply a deep burgundy lip liner all around the perimeter of your lips and then gently buff in the corners. Apply your red lipstick of choice and use your lip brush to blend the two colors together. If you feel any of your edges are a little uneven use a skin toned pencil to fix any problems. My favorite is by NYX Cosmetics and it's called their Wonder Pencil. You can use this all over the face including your eyes....and it's perfect for fixing any tiny boo-boos from dark lip.

This is a fantastic look for you blue eyed beauties ~ the gold and brown tones will really make your eyes pop. This is simple look to do but gives you really dramatic results! You could easily tone down this makeup as well. Go for a little less gold on the lid and maybe a red stain as opposed to red lipstick...and of course you could skip the lashes.
I hope you enjoyed this tutorial and stay tuned for my next Holiday Look ~ an Icy Winter Look!
Products
Maybelline Color Tattoo in Bold Gold
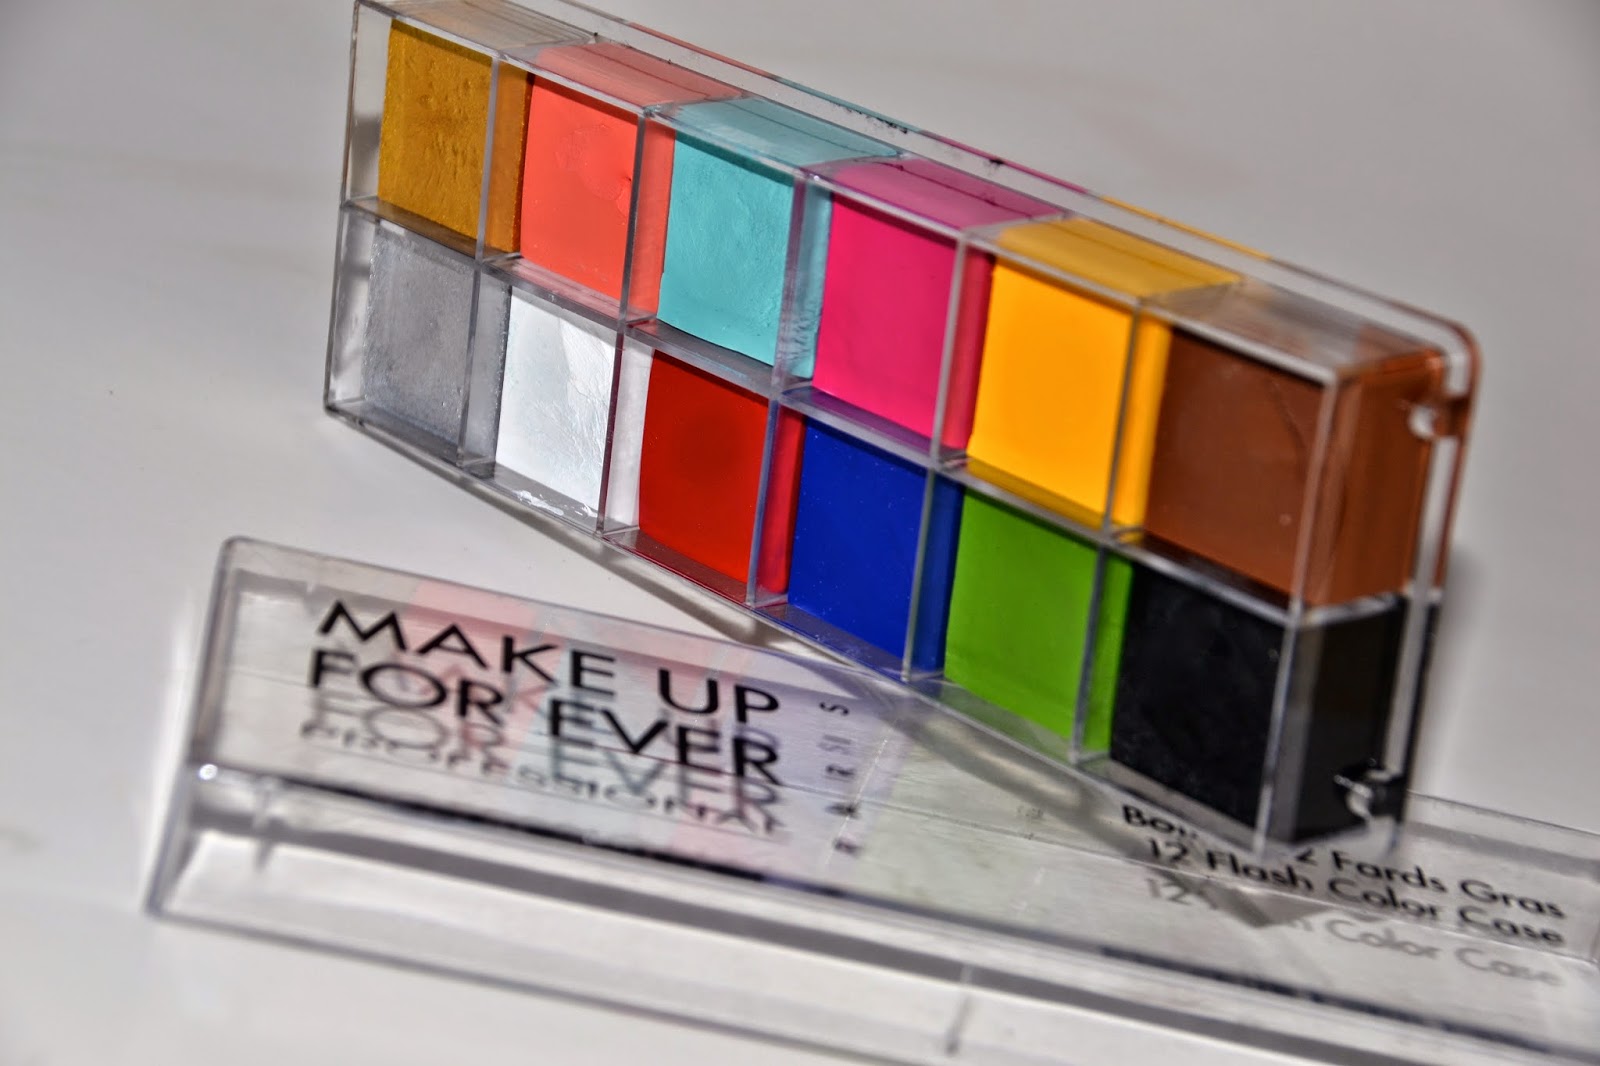
Lorac Pro Palette (taupe, gold, white & cream, espresso, black)
Brows - taupe from the Lorac palette
L'oreal Voluminous Carbon Black Mascara
Red Cherry False Lashes - #wsp
L'oreal True Match Foundation - W3
MAC Mineralize Concealer - NW20
Beauty Blender
Beauty Blender Micro Mini
Rimmel Stay Matte Powder Pressed Powder - Sandstorm
Benefit Hoola Bronzer
Benefit Sugarbomb Blush
Becca Shimmering Skin Perfector - Opal
Jordanna Easyliner Lip Liner - Cabernet
Wet n Wild Fergie Lipstick - Saraghina
The first look is all about shimmery gold eyes and sexy red lips!
As always start with a well hydrated face. I usually put my moisturizer on about 10 minutes before applying my makeup. If you have applied your moisturizer and it's been more than 30 minutes apply another light layer. This will help your makeup go on easier and help it to look better.
I started with the eyes today...first I used a soft gold cream base all over the lid. I softly blended that with my finger up into the crease. Using a fluffy blending brush I took a matte taupe shade and blended that through my crease using windshield washer motions.
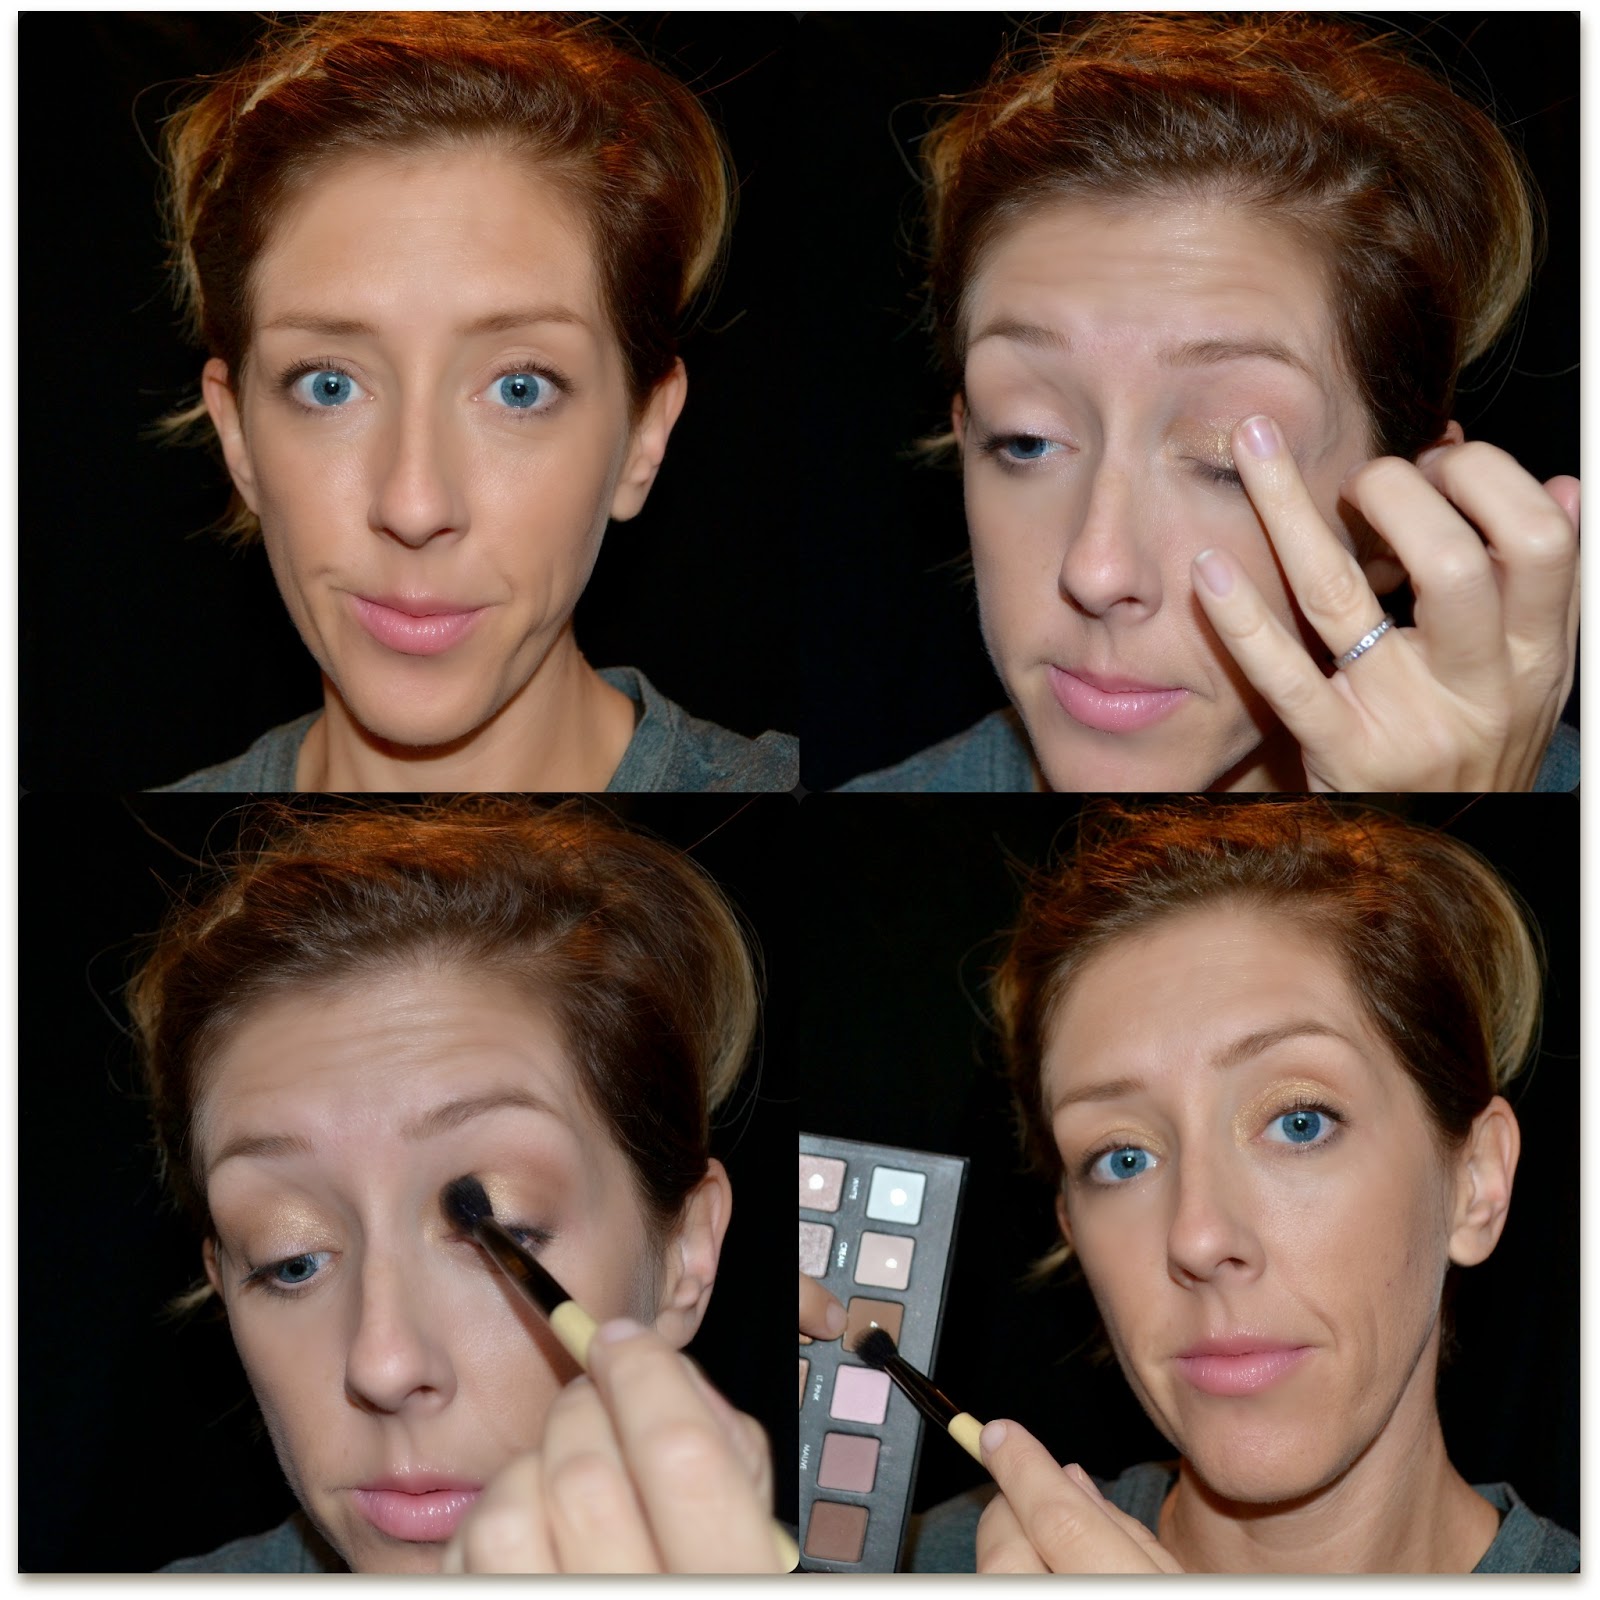 |
| Follow along the picture clockwise...starting with the upper left picture. |
 |
| Follow along L to R... |
 |
| Follow along the picture clockwise...starting with the upper left picture. |
Next apply your favorite mascara and if you choose false lashes...
Don't forget to your lower lash line. I applied the shadow the same way I applied on my lid: first the gold in the center of the lower lash line, then a little of the taupe, then in the outer corner the deep matte brown. And of course blended all three together!
Finally you can start working on the rest of your face. Be sure to fill in your brows, as this is a bold look you want to keep the face balanced. If you need help with how to fill in your brows click here.
I then dotted my foundation all over my face and used my damp beauty blender to blend it all in. I applied my concealer in an upside down triangle under my eyes and use the mini beauty blender to blend all that in. Lastly I used a translucent powder to set it all. Always remember when setting your concealer to pat on the powder as opposed to wiping...if you use wiping motions you will disturb the makeup you just applied.
Next I applied a matte bronzer to the outer perimeter of my face - I wanted more of a soft contour as opposed to a heavily chiseled look. I applied a blush that was a combination of a peach, pink and a purple. Lastly I applied a golden highlighter to the highest point of my cheekbones, a touch on the bridge of my nose and just a tiny bit on my cupids bow. To get a really soft glow use bouncing motions when applying your blush & highlighter.
 |
| Follow along L to R... |
Now onto the lips!
First apply a deep burgundy lip liner all around the perimeter of your lips and then gently buff in the corners. Apply your red lipstick of choice and use your lip brush to blend the two colors together. If you feel any of your edges are a little uneven use a skin toned pencil to fix any problems. My favorite is by NYX Cosmetics and it's called their Wonder Pencil. You can use this all over the face including your eyes....and it's perfect for fixing any tiny boo-boos from dark lip.
 |
| Follow along the picture clockwise...starting with the upper left picture. |
You're all done!!
This is a fantastic look for you blue eyed beauties ~ the gold and brown tones will really make your eyes pop. This is simple look to do but gives you really dramatic results! You could easily tone down this makeup as well. Go for a little less gold on the lid and maybe a red stain as opposed to red lipstick...and of course you could skip the lashes.
I hope you enjoyed this tutorial and stay tuned for my next Holiday Look ~ an Icy Winter Look!
Products
Maybelline Color Tattoo in Bold Gold
Lorac Pro Palette (taupe, gold, white & cream, espresso, black)
Brows - taupe from the Lorac palette
L'oreal Voluminous Carbon Black Mascara
Red Cherry False Lashes - #wsp
L'oreal True Match Foundation - W3
MAC Mineralize Concealer - NW20
Beauty Blender
Beauty Blender Micro Mini
Rimmel Stay Matte Powder Pressed Powder - Sandstorm
Benefit Hoola Bronzer
Benefit Sugarbomb Blush
Becca Shimmering Skin Perfector - Opal
Jordanna Easyliner Lip Liner - Cabernet
Wet n Wild Fergie Lipstick - Saraghina

Comments
Post a Comment